Normally when you are in the middle of writing a routine, you may not take the time to declare local variables as you add them to your code. In fact, if you are testing and debugging you may want the variables to remain global. When you are ready though, there is an easy way to gather up all the variables used in a function.
First, lets look at an existing function in the Visual Lisp Editor (VLIDE).
[Note: this sample code was taken from the Visual Lisp help file]
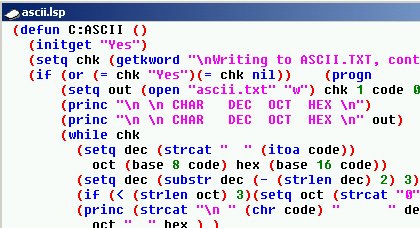
Right after the defun statement, there are two parenthesis. These parenthesis are used to contain arguments and local variables. An empty set are still required even when you don't have either item.
In the VLIDE, go to the Tools menu, then choose Environment Options, then General Options. Switch to the Diagnostic tab and make sure that "Report statistics during syntax checking" is toggled ON.
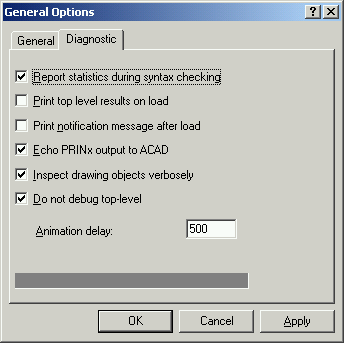
Close this dialog. Make sure the window with your code is current in the VLIDE. Now look for the "Tools" toolbar. Click on the third icon from the left (this should be "Check Edit Window").

After you click this button, the Build Window will appear in the VLIDE. In this window will be a list of all global variables.

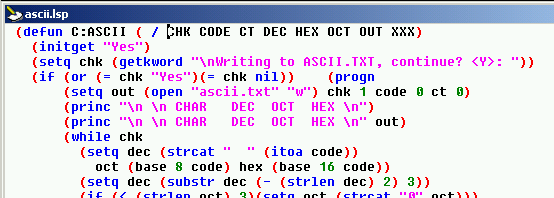
Copy this list of variables, along with the parenthesis, to your code window overwriting the single pair of parenthesis shown earlier. Add the required "/" character after the first parenthesis and then add a space after it. (The "/" character separates function arguments from local variables).
The result is shown here.
This was just a small example, but if you ever work on a large routine with dozens of variables, this tip can really help.
Labels: Programming
PermaLink Posted 7/24/2006 06:13:00 PM Comments (2)
06 July 2006
Newsgroup posts
I was digging through some old CD's that I had archived some time ago and ran across some old newsgroup articles (from news://discussion.autodesk.com/autodesk.autocad.customization ) that I had saved.
I think this is still some good info - here are the links...
bit codes
PermaLink Posted 7/06/2006 06:37:00 PM Comments (0)
I think this is still some good info - here are the links...
bit codes
Create a Layer List and thier current state to a file
How to determine if a point is on a polyline
Labels: Reference
PermaLink Posted 7/06/2006 06:37:00 PM Comments (0)
02 July 2006
AutoCAD customization - Setup and migration
I constantly get questions like "How to I get my custom toolbars off my old install and put them into my new AutoCAD" -or- "I had to run a repair on my AutoCAD, what happened to my custom pull-down menu?"
Sure it's easy to add a pull-down menu or toolbar, but do you know where this data lives? Do you know how to back it up? Do you know how to migrate it to your friends machine, or to a new install of the latest version?
Here are some tips of how to setup your AutoCAD customization so that it's easy to use, backup, and migrate.
The procedures below are described for AutoCAD 2006/2007, earlier versions are similar. Any items specific to 2006/2007 are marked with *.
Why add this path to the top? AutoCAD automatically loads certain files at application startup and at drawing startup. In doing so, it searchs the support file search path in the order specified. loads the first file it finds, then quits looking. For example, if you have a custom acad.pgp in C:\CADSTUFF and this path is at the top, it will be found and loaded. It doesn't matter if there are 2 or 3 other files named acad.pgp in other directories, these will not be found or loaded.
If you want to create a custom menu or toolbars, do not customize the stock "acad.cui". Why? Because your changes can be lost during the next reinstall, repair, service pack application, or upgrade that you perform. Create your own menu file and partially load it instead. As mentioned, AutoCAD will automatically partial load the menu named custom.cui (a blank one is supplied with AutoCAD) *, or you can create your own menu, like "mymenu.cui". Either way, save this new menu to your C:\CADSTUFF directory.
Now all your customization is saved in a single directory, so it's easy to back up, easy to find when edits are needed, and you don't have to worry about migrating these customizations to future releases. When that time comes, simply add C:\CADSTUFF to the top of the support file search path again.
If you work in a network environment and you want to have a single copy of these customizations for all users, then instead of making C:\CADSTUFF on your local machine, create a network share like \\MYSERVER\CADSTUFF. Then add that path to the top of everyone's support file search path. Make sure to set the network security permissions accordingly so that only the necessary persons have write access to this location.
PermaLink Posted 7/02/2006 07:27:00 AM Comments (2)
Sure it's easy to add a pull-down menu or toolbar, but do you know where this data lives? Do you know how to back it up? Do you know how to migrate it to your friends machine, or to a new install of the latest version?
Here are some tips of how to setup your AutoCAD customization so that it's easy to use, backup, and migrate.
The procedures below are described for AutoCAD 2006/2007, earlier versions are similar. Any items specific to 2006/2007 are marked with *.
- Create a new directory, let's call it C:\CADSTUFF
- Add this new directory to the top of your support file search path.
- Place all your custom files in this new directory.
- This might include:
- acad.lsp - this lisp file is loaded automatically at the startup of AutoCAD. This file may contain commands and operations that only need to be done once per AutoCAD session. If the system variable ACADLSPASDOC is set to 1, then this file is loaded every time a new drawing is opened. I suggest keeping ACADLSPASDOC set to 0.
- acaddoc.lsp - This lisp file is loaded automatically each time a drawing is opened. It might contain lisp routines that need to be loaded in each drawing. You can also include (setvar) commands to set system variables that are not saved in the drawing or registry.
- custom.cui - This menu file is partially loaded automatically each time AutoCAD starts *
- custom.mnl - This lisp file is loaded automatically each time custom.cui is loaded.
- acad.pgp - AutoCAD program parameters file. See AutoCAD HELP for more information.
- acad.fmp - Font mapping file. See AutoCAD HELP for more information.
- custom linetype files
- custom hatch patterns
- custom shape files
- and more...
- acad.lsp - this lisp file is loaded automatically at the startup of AutoCAD. This file may contain commands and operations that only need to be done once per AutoCAD session. If the system variable ACADLSPASDOC is set to 1, then this file is loaded every time a new drawing is opened. I suggest keeping ACADLSPASDOC set to 0.
Why add this path to the top? AutoCAD automatically loads certain files at application startup and at drawing startup. In doing so, it searchs the support file search path in the order specified. loads the first file it finds, then quits looking. For example, if you have a custom acad.pgp in C:\CADSTUFF and this path is at the top, it will be found and loaded. It doesn't matter if there are 2 or 3 other files named acad.pgp in other directories, these will not be found or loaded.
If you want to create a custom menu or toolbars, do not customize the stock "acad.cui". Why? Because your changes can be lost during the next reinstall, repair, service pack application, or upgrade that you perform. Create your own menu file and partially load it instead. As mentioned, AutoCAD will automatically partial load the menu named custom.cui (a blank one is supplied with AutoCAD) *, or you can create your own menu, like "mymenu.cui". Either way, save this new menu to your C:\CADSTUFF directory.
Now all your customization is saved in a single directory, so it's easy to back up, easy to find when edits are needed, and you don't have to worry about migrating these customizations to future releases. When that time comes, simply add C:\CADSTUFF to the top of the support file search path again.
If you work in a network environment and you want to have a single copy of these customizations for all users, then instead of making C:\CADSTUFF on your local machine, create a network share like \\MYSERVER\CADSTUFF. Then add that path to the top of everyone's support file search path. Make sure to set the network security permissions accordingly so that only the necessary persons have write access to this location.
PermaLink Posted 7/02/2006 07:27:00 AM Comments (2)